Showing posts with label WebAPI registration. Show all posts

Monday, February 17, 2020

D365FO - WebAPI registration for custom web services


When developing web services within D365FO for other applications/languages we need to follow a new authentication process compared to AX 2012 since everything is hosted on Azure. The following will show you the settings that need to be defined within your Azure dashboard and within D365FO to enabled authentication to execute a custom web service (SOAP/JSON) or Odata calls.

It is good to note that you may need to setup up a webapi or a native application depending on what you are trying to accomplish. Both are about the same just the native application does not require the key generation.

Before I go over the steps needed the following goes over the multiple types of authentication for Azure and explains the difference between Native vs Web API auth scenarios: https://docs.microsoft.com/en-us/azure/active-directory/develop/authentication-scenarios 


Azure Setup for defined credentials/web api

Register a web app / api

Step 1: In the Azure port go to Azure Active Directory > App registrations > New Application registration

Step 2: Enter in the environment information for D365 and hit create

Step 3: Once initialized click on the settings button


Step 4: Click on required permissions > add > Select API


Step 5: Choose "Microsoft Dynamics ERP"

Select which options you want to give it access to. (usually all of them)

Choose done.

Step 6:  choose "keys"

 Under password input a description and choose when the cert should expire


Hit the save button and save the "value" aka the key. This is what will be used as a "handshake"


Step 7 (optional): Do the same thing but for a native application (interactive login). Just enter the main login url as the redirect url. You will not need the Key generation part.


D365FO setup:

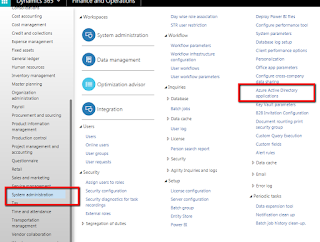
Step 8 : In D365FO go to System administration > Setup > Azure Active Directory applications and create a new record for the app registration with the client id(s) from the Azure setup. If you are using the defined cred's via the web app / api type as listed below the User Id listed in this screen is what the system will log an new records created via the webservice


D365FO Web API registration for POST MAN

Most of the time we used 3rd Party tool like fiddler, Post Man and SoupUI as client to consume web services.


In this blog i will explain, How can we use POST MAN to consume Web-API by using Oauth2 Azure Authentication.


Step-1 Download the POST MAN from the this link.

Step-2 Register The Azure Application (Web API). You can follow this link

Step-3 Add the below URL in Reply URL section https://www.getpostman.com/oauth2/callbackcheck the below screen shot.


Step-4 Once App registration completed Enter Application ID in D365FO

Reference screenshot

Step-5 Open POST man and navigate to Authorization Tab and select OAuth2 as Authentication Type.

Reference screenshot


Step-6 click on Get New Access Token. A Popup will appear.

Reference screenshot


Step-7 Fill the required fields Like below

Call Back URL > You can't change this.
Token Name (As per your requirement)
Auth URL

https://login.windows.net/YourTenant.com/oauth2/authorize?resource=https://EnvironmentURL.operations.dynamics.com

Access Token URL
https://login.windows.net/YourTenant.com/oauth2/token?resource=https://EnvironmentURL.operations.dynamics.com

You can find the tenant from AX as well. Open D365FO Click on Setting icon. you can find the on top right of the screen then click on about.


Client ID > Application ID You Registered On Azure Portal
Secret Key > Enter the secret key you generate against your Azure Application.
If you don't provide secret key then a popup window will appear for login.


Reference Screenshot

Step-8 Click on Request Toke. Within 4 to 5 second you will get the Azure Authentication Token.

Step-9  Now select the Header value from the drop down and click on USE token to add this token in your request.

Reference screenshot


Step-10 Navigate to Header Tabs for the verification of Authorization token in your request

Reference screenshot

Step-11 Enter the Complete service URL and click on send. in my case I have called getFoo service.

Reference screenshot


Please check the above screen shot. You will find the success result 

Original post: http://d365technext.blogspot.com/2018/07/dynamics-365-finance-operation-webapi.html