Wednesday, January 22, 2020

Filter, Search, and LookUp functions in Power Apps

Lookup
The LookUp function finds the first record in a table that satisfies a formula. Use LookUp to find a single record that matches one or more criteria.
If no record found, it will return Blank
LookUpTableFormula [, ReductionFormula ] )

ReductionFormula  = return value formula, it is optional parameter, if the value is not passed the entire record will be returned


Filter
The Filter function is used to find records in a table that meet formula criteria.
If no record found, it will return empty table
FilterTableFormula1 [, Formula2, ... ] )

Search
The Search function is different from Filter in that you are finding records that contain a string.
If no record found, it will return empty table.
SearchTableSearchStringColumn1 [, Column2, ... ] )

Tuesday, January 7, 2020

Get last approver of workflow in Dynamics AX

public Name workflowApprover(RecId _recId)
        {
            WorkflowTrackingStatusTable workflowTrackingStatus;
            WorkflowTrackingTable workflowTrackingTable;
            WorkflowTrackingCommentTable workflowTrackingCommentTable;
            UserInfo userInfo;
       
            select firstFast RecId, User from workflowTrackingTable
                order by RecId desc
            join workflowTrackingCommentTable
                where workflowTrackingCommentTable.WorkflowTrackingTable == workflowTrackingTable.RecId
            join UserInfo
                where UserInfo.id == WorkflowTrackingTable.User
            exists join workflowTrackingStatus
                where workflowTrackingTable.WorkflowTrackingStatusTable == workflowTrackingStatus.RecId
            && workflowTrackingStatus.ContextRecId      == _recId
            && workflowTrackingStatus.ContextTableId    == tableNum(CICGBCreditCommittal)// your custom table on which workflow is enabled.
            && workflowTrackingTable.TrackingType == WorkflowTrackingType::Approval;
       
            if (workflowTrackingTable.RecId > 0)
            {
                return userInfo.name;
            }
            else
            {
                return '';
            }
       }


Display method.


display Name displayWorkflowApproverName()
{
    WorkflowTrackingStatusTable     workflowTrackingStatus;
    WorkflowTrackingTable           workflowTrackingTable;
    WorkflowTrackingCommentTable    workflowTrackingCommentTable;
    UserInfo                        userInfo;
    Name                            _name;


    select firstFast RecId, User from workflowTrackingTable
        order by RecId desc
            join workflowTrackingCommentTable
        where workflowTrackingCommentTable.WorkflowTrackingTable == workflowTrackingTable.RecId
            join UserInfo
        where UserInfo.id == WorkflowTrackingTable.User
            exists join workflowTrackingStatus
        where workflowTrackingTable.WorkflowTrackingStatusTable == workflowTrackingStatus.RecId
    && workflowTrackingStatus.ContextRecId      == this.RecId
    && workflowTrackingStatus.ContextTableId    == tableNum(CICGBCreditCommittal)
    && workflowTrackingTable.TrackingType       == WorkflowTrackingType::Approval;

    if (workflowTrackingTable.RecId > 0)
    {
        _name=userInfo.name;
    }

    else
    {
        _name='';
    }
    return _name;

}

Monday, January 6, 2020

Performance testing in D365FO


Need to execute for single user
Need to increase multiple user as 100 then 500 user


     Pre-requisites
  1. Visual studio enterprise edition 2015 or later version.
  2. Selenium dot net tools 3.13 version for platform 21 or later updates.
  3. IEDriverServer x64 bit
  4. ODBC Driver 17 for SQL server
  5. Local certificate for authentication
  6. Test administrator account

    Performance testing environment readiness

  • Login into performance testing environment
  • Download the selenium software based on your Dynamics 365 for operations platform version https://selenium-release.storage.googleapis.com/index.html?path=3.13/
    1. For D365FO platform version 21 and above, you need to choose Version 3.13.1 version, if the platform version 20 or below you need to choose the selenium 2.0 version
    2. Download IEDriverServer_Win32 3.13.0.zip
    3. Right click the zip files -> Properties -> Unblock
    4. Right click -> Extract all (specify the folder path where you want to extract)
    5. In the dist folder, rename the .nupkg files as .zip files, and then unzip them.
      1. Selenium.Support.StrongNamed.3.13.1.nupkg file renamed as Selenium.Support.StrongNamed.3.13.1.zip
      2. Selenium.WebDriver.StrongNamed.3.13.1.nupkg file renamed as Selenium.WebDriver.StrongNamed.3.13.1.zip
    6. Create the following folder structure Under your PerfSDK folder, PerfSDKLocalDirectory\Common\External\Selenium.
      1. Copy below files into that folder from the downloaded file
        1. IEDriverServer.exe from the unzipped IEDriverServer_Win32_3.13.0.zip file
        2. WebDriver.dll and WebDriver.xml from the lib\net45 folder in the unzipped Selenium.WebDriver.StrongNamed.3.13.1.zip file
        3. WebDriver.Support.dll and WebDriver.Support.xml from the lib\net45 folder in the unzipped Selenium.Support.StrongNamed.3.13.1.zip file
                                  8. C:\PerfSDK\PerfSDKLocalDirectory\Common\External\Selenium


    Task recorder
    1. Go to Task recorder
    2. Create a recording for the scenario.
    3. Download the task recorder as download developer mode
     

    1. The recording file will be saved as XML format. (XML will be downloaded into default folder based on browser settings C:\Users\xyz\downloads)

    Generate C#  file for performance test from task recorder .

    1. Open Visual studio in Administrator mode.
    2. Sample performance testing project is available in the system
    3. Open PerfSDKSample solution, the folder path will be C:\PerfSDK\PerfSdkSample (local VM) or K:\PerfSDK\PerfSDKLocalDirectory\PerfSDKSample (Tier 1 or cloud hosted environment)
    4. Add a reference to the WebDriver.dll file in the Common\External\Selenium

    1. Import task recording into Visual studio
      1. Dynamics 365-> Add ins ->Create C# perf test from recording

    1. It will open the import POP window.
      1. Recording path – The file location of the developer recording of your end-to-end scenario.
      2. Project path – The location of the PerfSDKSample project. Typically, the path is <Your_PerfSDK_Folder>\SampleProject\PerfSDKSample\PerfSDKSample.csproj.
      3. PerfSDK path – The location of PerfSDK. Typically, the path is <ServiceVolumeDrive>\PerfSDK\PerfSDKLocalDirectory.
      4. Click import
    2. C# file will be generated and stored against the project.
    3. Build the solution

    CloudEnvironment config file update
    1. Update the CloudEnvironment.config file of the PerfSDKSample project
    2. Microsoft planned to implement the PerfSDK using Azure authentication method, but it is not implemented fully so follow below steps to remove the azure authentication.
      1. In each AuthenticatorConfiguration element under the AuthenticatorConfigurationCollection element, replace AadAuthenticator with SelfMintedTokenAuthenticator.
      2. Comment out the AzureActiveDirectoryConfiguration and KeyVaultConfigurations elements.

    1. In Visual Studio, on the Test menu, point to Windows, and then select Test Explorer
    2. Right-click your test case, and then select Run selected tests.

    Tips
    • Use the following tips and tricks for single-user testing that uses Task recorder and the Performance SDK:
      • Run your business end-to-end scenario first, before you capture it by using Task recorder.
      • When you record your scenario by using Task recorder, enter values manually instead of selecting them in drop-down lists.
      • Replay your task recording to make sure that everything works as you expect.
      • Restart Visual Studio if you don't see your test case after the solution is built


    For Multi - user test / Load test setup

    1. First step need to update the performance SDK folder in the system environment variables (My computer -> Right click "Properties" -> Advanced system settings -> Advanced -> Environment variables)
      1. The PerfSDK folder is available in C drive for Local one box, K drive for cloud environment
    2. Platform update 21 or later version Microsoft using ODBC 17 SQL driver, so download the ODBC 17 SQL server and placed in C:\PerfSDK\Visual studio online tools
    3. Currently Microsoft not implemented the Azure authentication, so they are authenticating the application using local certificates while performing the load test from local box or azure DevOps.
      1. Generate the local certificate without password using windows Power shell
        1. Navigate the following path C:\Program Files (x86)\Windows Kits\8.1\bin\x64\
        2. Open Windows PowerShell in administrator mode and execute below command
        3. makecert.exe -n "CN=127.0.0.1" -ss Root -sr LocalMachine -a sha256 -len 2048 -cy end -r -eku 1.3.6.1.5.5.7.3.1 -sky exchange -sv c:\temp\AuthCert.pvk c:\temp\AuthCert.cer
        4. The Computer name should be 127.0.0.1 (i.e.) CN=127.0.0.1
        5.   
        6. Don’t enter any password and click Ok
        7.   
        8. Certificates generated and stored in the specified path.
        9.   
        10. Copy the ThumpPrint of the certificate and paste it note pad, the value need to update some other files.
        11.   

    1. Install the generated certificate(AuthCert)  into Manage computer certificates -> Personal -> Certificates folder.
    2.   
    3. Copy and paste the generated certificate into PerfSDK folder. This certificate will be uploaded into azure devOps later.

    1.   

    1. Once certificate generation is completed need to update the 2 files (Setup,CloudCtuFakeACSInstall) inside the Visual studio online folder
    2. Open the Setup command file in notepad(Run as administrator mode)
    3. Update the generated certificate name in the file
    4.   
    5. Open CloudQuFakeACSInstall file in notepad (Run as administrator mode)
    6. AS we generated the certificate without password protection, pass empty string as password.
    7.   
    1. Now go to Visual studio and update default test processor architecture from x86 to x64.
      1. Visual studio -> Test -> Test settings  -> Default Processor architecture -> x64
      2.   


    1. Update cloud config files with Host name, Soap host name, self SigningCertificateThumprintm, user count, user format (test user), Tenant account and Performance monitor administrator account.
    2. The test user account and Administrator account should be in same tenant (domain)

    1. Go to visual studio sample project solutions
    2. Open VSOnines.testsettings
      1. Select the Test run locations (from Local computer or azure devops) in General Tab
        1. if you select local computer, the local computer will be act as test controller
        2. If you select the Azure devOps, the azure cloud will be act as a test controller
        3.   
      2. Enable deployment in deployment tab and add the following folder as per below screenshot.
        1.  
    3. Update the 64 bit processor details in Host tab.
      1.   
    4. In case of The test location is selected as Azure devOps in "General" tab
      1. Select the Setup script(C:\PerfSDK\Visual Studio Online\setup.cmd) in "Setup and Cleanup scripts" tab.
    5. Open SampleLoadTest file from the solution explorer.
    6. In the TestMix node verfiy all your testing scenarios are added, in this case I have added only one test sceanrio, but in real time we will have multiple test scenarios will be listed.
    1. Right click the Testmix and click the Edit TestMix
    2. Here we can specify how many user going to execute the each test case, what is the percentage of each test case.

    1.   

    1. In the Run Settings node properties, you can specify the time interval to run the test case, how much time the test should process.
    2. Once you complete the setup Open the C# class which is generated using task recorder.
    3. The MS.Dynamics.TestTools.CloudCommonTestUtilities and  MS.Dynamics.TestTools.UIHelpers.Core classes need to add as a reference  before the class declaration

    1.   
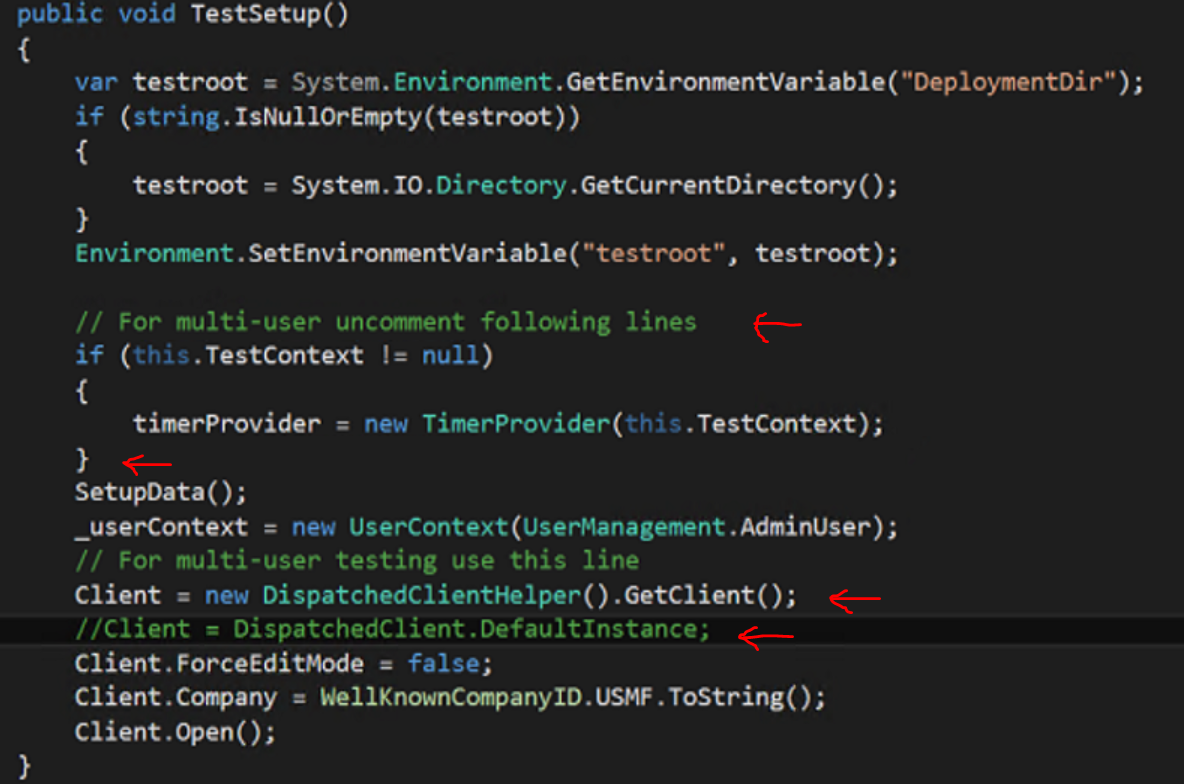
Modify the TestSetup method by adding the following lines to the beginning of the TestSetup() method.
var testroot = System.Environment.GetEnvironmentVariable("DeploymentDir");
if (string.IsNullOrEmpty(testroot))
{
Environment.SetEnvironmentVariable("testroot", testroot);
testroot = System.IO.Directory.GetCurrentDirectory();


}

  • In the TestSetup method, uncomment lines in the code titled "for multi-user uncomment following lines", and comment out the following line.
Client = DispatchedClient.DefaultInstance;

    1. Modified code

    Modify the TestCleanup method so that it resembles the following example.

    public void TestCleanup() { Client.Close(); Client.Dispose(); Client = Null; //_userContext.Dispose();
    } Repeat steps for all the C# performance test classes that you have.
         When you've finished, build the solution.
            
      1. Open WIF configuration file in Notepad(Run as administrator mode) (C:\AosService\webroot\wif.config file
        1. Add the Thumprint of the certificate which imported earlier step.

      1.   

      1. Save and close the file
      2. Restart the IIS
      3. Once all steps are completed the environment is ready for performance testing with multiple user
      4. Go to solution explorer Open SampleLoadTest object
      5. Run load test

      1.     


      Run the Load test multiple times and compare the value between the test cases execution


      Tips and tricks.
      1. Enter the values manually when capture scenarios with task recorder
      2. Maintain scripts for both single and multi-user
      3. Add workload incrementally
      4. Use real test users under your tenant during validation stage